Pi-hole version 5
Pi-hole is a fantastic utility to reduce ads.
Pi-hole variants
In early 2025, Pi-hole underwent some major changes which broke compatibility with previous versions. In particular, the naming scheme for environment variables changed drastically. For IOTstack users, the immediate result of "pulling" the latest image from DockerHub was silent behavioural changes by the container.
IOTstack reacted to this problem by pinning to version 2024.07.0. This was to "hold the ring" pending a solution. The solution is that the IOTstack menu now supports two variants:
-
Pi-hole 5
The IOTstack menu refers to this as
pihole. It is pinned to version 2024.07.0 which is the final release of version 5. This document describes version 5. -
Pi-hole 6
The IOTstack menu refers to this as
pihole6. That variant tracks DockerHub images with thelatesttag so it will keep updating as later versions are released. See Pi-hole version 6.
If you are installing Pi-hole for the first time, you should choose pihole6 from the menu.
See migration if you are currently running Pi-hole 5 and want to upgrade to Pi-hole 6.
Note:
- You can't run both versions at the same time. That is because they both claim the same network ports.
References
Definitions
Although this documentation assumes you will be running the Pi-hole service on a Raspberry Pi, there is nothing stopping you from running Pi-hole on other platforms (eg Intel Nuc, Proxmox-VE) or Linux distributions (eg Debian or Ubuntu). This document uses the definition below to try to encompass all those possibilities:
- “Pi-hole system”
- The host platform where the Pi-hole service is running.
Environment variables
In conjunction with controls in Pi-hole's web GUI, environment variables govern much of Pi-hole's behaviour.
If you are running new menu (master branch), environment variables are inline in your compose file. If you are running old menu, the variables will be in:
~/IOTstack/services/pihole/pihole.env
There is nothing about old menu which requires the variables to be stored in the
pihole.envfile. You can migrate everything todocker-compose.ymlif you wish.
Pi-hole's authoritative list of environment variables can be found here. Although many of Pi-hole's options can be set through its web GUI, there are two key advantages to using environment variables:
- If you ever need to reset Pi-hole by erasing its persistent storage area, configuration options set using environment variables will persist while those set through the GUI may be lost; and
- On at least two occasions in its history, Pi-hole upgrades have had the effect of wiping configuration options set through the GUI, whereas options set using environment variables survived.
Admin password
By default, Pi-hole does not have an administrator password. That is because the default service definition provided by IOTstack contains the following environment variable with no value on its right hand side:
- WEBPASSWORD=
Each time the Pi-hole container is launched, it checks for the presence or absence of the WEBPASSWORD environment variable, then reacts like this:
-
If
WEBPASSWORDis defined but does not have a value:- No admin password is set;
- Any previous admin password is cleared;
- You will be able to connect to Pi-hole's web interface without providing a password (you won't even see the login screen); and
- The main menu (≡) will not contain a logout command.
This is the default situation for IOTstack.
-
If
WEBPASSWORDis defined and has a value, that value will become the admin password. For example, to change your admin password to be "IOtSt4ckP1Hol3":-
Edit your compose file so that Pi-hole's service definition contains:
- WEBPASSWORD=IOtSt4ckP1Hol3 -
Run:
$ cd ~/IOTstack
$ docker-compose up -d pihole
docker-compose will notice the change to the environment variable and re-create the container. The container will see that
WEBPASSWORDhas a value and will change the admin password to "IOtSt4ckP1Hol3".You will be prompted for a password whenever you connect to Pi-hole's web interface.
-
-
If
WEBPASSWORDis undefined (absent from your compose file), Pi-hole behaves like this:-
If this is the first time Pi-hole has been launched, a random password is generated.
Pi-hole senses "first launch" if it has to initialise its persistent storage area. See also getting a clean slate. You can discover the password by running:
$ docker logs pihole | grep randomRemember, docker logs are cleared each time a container is terminated or re-created so you need to run that command before the log disappears!
-
Otherwise, whatever password was set on the previous launch will be re-used.
-
about pihole -a -p
Some Pi-hole documentation on the web recommends using the following command to change Pi-hole's admin password:
$ docker exec pihole pihole -a -p «yourPasswordHere»
That command works but its effect will always be overridden by WEBPASSWORD. For example, suppose your service definition contains:
- WEBPASSWORD=myFirstPassword
When you start the container, the admin password will be "myFirstPassword". If you run:
$ docker exec pihole pihole -a -p mySecondPassword
then "mySecondPassword" will become the admin password until the next time the container is re-created by docker-compose, at which point the password will be reset to "myFirstPassword".
Given this behaviour, we recommend that you ignore the pihole -a -p command.
Logging
You can control the amount of information Pi-hole retains about your DNS queries using the "Privacy Settings" tab of the "Settings" group. The default is "Show & record everything".
If you choose any option except "Anonymous mode", then Pi-hole divides the logging store into two parts:
- Entries which are more recent than 24 hours; and
- Entries which are older than 24 hours.
In the "System" tab of the "Settings" group is a Flush logs (last 24 hours) button. Clicking that button erases all log entries which are more recent than 24 hours. The button does not erase entries which are older than 24 hours.
Retention of log entries older than 24 hours is controlled by the following environment variable:
- FTLCONF_MAXDBDAYS=365
The default (which applies if the variable is omitted) is to retain log entries for 365 days.
Depending on your DNS activity, the database where the log entries are stored can become quite large. Setting this variable to a shorter period will help you control the amount of storage Pi-hole consumes on disk and in your backups.
Tip:
-
Adding this variable to an existing service definition, or changing the number of days to be less than the previous setting will not reduce the size of the logging database. Although Pi-hole will implement the change, the SQLite database where the logs are written retains the released storage for subsequent re-use. If you want to reclaim that space, run the following command:
$ sqlite3 ~/IOTstack/volumes/pihole/etc-pihole/pihole-FTL.db "vacuum;"The command should not need
sudobecausepiis the owner by default. There is no need to terminate Pi-hole before running this command (SQLite handles any contention).
Recursive resolvers
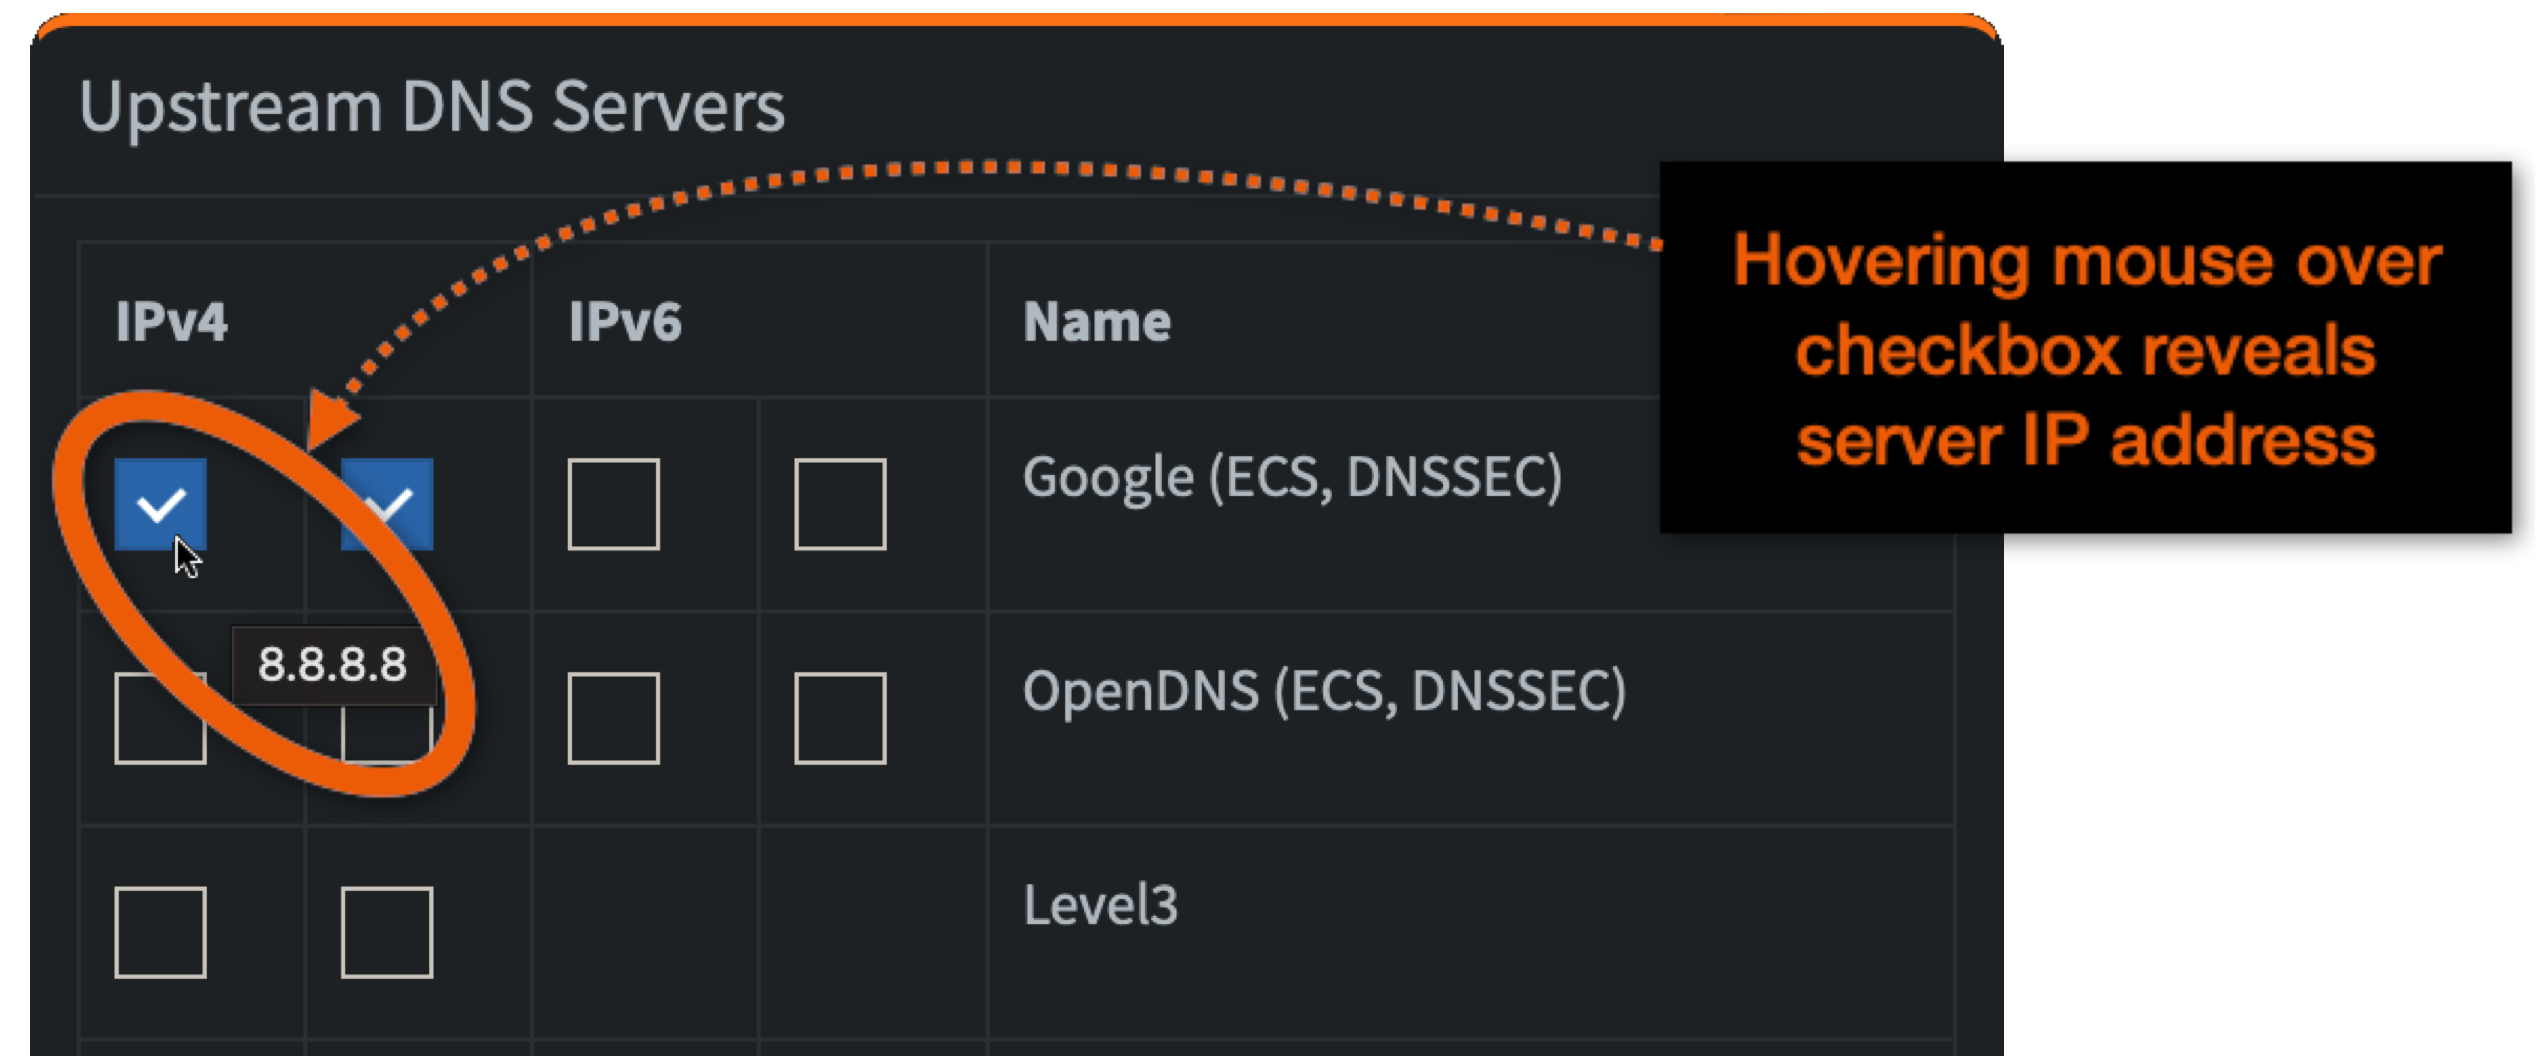
You can control which public DNS servers are used by PiHole when it needs to refer queries to the Internet. You do this by enabling or disabling checkboxes in the "Upstream DNS Servers" panel of the "DNS" tab in the "Settings" group.
The default is to use the two Google IPv4 DNS servers which correspond with 8.8.8.8 and 8.8.4.4, respectively.
An alternative to toggling checkboxes in the Pi-hole GUI is to use an environment variable:
- PIHOLE_DNS_=8.8.8.8;8.8.4.4
The variable does end with an underscore!
This variable takes a semi-colon-separated list of DNS servers. You can discover the IP address associated with a checkbox by hovering your mouse pointer over the checkbox and waiting for a tool-tip to appear:
Advanced variables
(advanced) reverse DNS query handling
First, understand that there are two basic types of DNS query:
-
forward queries:
- question: "what is the IP address of fred.yourdomain.com?"
- answer: 192.168.1.100
-
reverse queries:
- question: "what is the domain name for 192.168.1.100?"
- answer: fred.yourdomain.com
Pi-hole has its own built-in DNS server which can answer both kinds of queries. The implementation is useful but doesn't offer all the features of a full-blown DNS server like BIND9. If you decide to implement a more capable DNS server to work alongside Pi-hole, you will need to understand the following Pi-hole environment variables:
-
REV_SERVER=If you configure Pi-hole's built-in DNS server to be authoritative for your local domain name,
REV_SERVER=falseis appropriate, in which case none of the variables discussed below has any effect.Setting
REV_SERVER=trueallows Pi-hole to forward queries that it can't answer to a local upstream DNS server, typically running inside your network. -
REV_SERVER_DOMAIN=yourdomain.com(where "yourdomain.com" is an example)The Pi-hole documentation says:
"If conditional forwarding is enabled, set the domain of the local network router".
The words "if conditional forwarding is enabled" mean "when
REV_SERVER=true".However, this option really has little-to-nothing to do with the "domain of the local network router". Your router may have an IP address that reverse-resolves to a local domain name (eg gateway.mydomain.com) but this is something most routers are unaware of, even if you have configured your router's DHCP server to inform clients that they should assume a default domain of "yourdomain.com".
This variable actually tells Pi-hole the name of your local domain. In other words, it tells Pi-hole to consider the possibility that an unqualified name like "fred" could be the fully-qualified domain name "fred.yourdomain.com".
-
REV_SERVER_TARGET=192.168.1.5(where 192.168.1.5 is an example):The Pi-hole documentation says:
"If conditional forwarding is enabled, set the IP of the local network router".
This option tells Pi-hole where to direct forward queries that it can't answer. In other words, Pi-hole will send a forward query for fred.yourdomain.com to 192.168.1.5.
It may be appropriate to set
REV_SERVER_TARGETto the IP address of your router (eg 192.168.1.1) but, unless your router is running as a DNS server (not impossible but uncommon), the router will likely just relay any queries to your ISP's DNS servers (or other well-known DNS servers like 8.8.8.8 or 1.1.1.1 if you have configured those). Those external DNS servers are unlikely to be able to resolve queries for names in your private domain, and won't be able to do anything sensible with reverse queries if your home network uses RFC1918 addressing (which most do: 192.168.x.x being the most common example).Forwarding doesn't guarantee that 192.168.1.5 will be able to answer the query. The DNS server at 192.168.1.5 may well relay the query to yet another server. In other words, this environment variable does no more than set the next hop.
If you are planning on using this option, the target needs to be a DNS server that is authoritative for your local domain and that, pretty much, is going to be a local upstream DNS server inside your home network like another Raspberry Pi running BIND9.
-
REV_SERVER_CIDR=192.168.1.0/24(where 192.168.1.0/24 is an example)The Pi-hole documentation says:
"If conditional forwarding is enabled, set the reverse DNS zone (e.g. 192.168.0.0/24)".
This is correct but it lacks detail.
The string "192.168.1.0/24" defines your local subnet using Classless Inter-Domain Routing (CIDR) notation. Most home subnets use a subnet-mask of 255.255.255.0. If you write that out in binary, it is 24 1-bits followed by 8 0-bits, as in:
   255  .   255  .   255  .   0
11111111 11111111 11111111 00000000
Those 24 one-bits are where the
/24comes from in192.168.1.0/24. When you perform a bitwise logical AND between that subnet mask and 192.168.1.0, the ".0" is removed (conceptually), as in:192.168.1.0 AND 255.255.255.0 = 192.168.1What it means is:
- The network prefix is "192.168.1".
- This host on the 192.168.1 network is the reserved address "192.168.1.0". It is better to think of this as "the network prefix followed by all-zero bits in the host portion". It is not common to see the .0 address used in practice. A device either knows its IP address or it doesn't. If it doesn't then it won't know its prefix so it will use 0.0.0.0 as a substitute for "this".
- The range of IP addresses available for allocation to hosts on this subnet is 192.168.1.1 through 192.168.1.254 inclusive.
- All hosts on the 192.168.1 network (ie broadcast) is the reserved address "192.168.1.255". It is better to think of this as "the network prefix followed by all-one bits in the host portion".
When you set
REV_SERVER_CIDR=192.168.1.0/24you are telling Pi-hole that reverse queries for the host range 192.168.1.1 through 192.168.1.254 should be sent to theREV_SERVER_TARGET=192.168.1.5.
Pi-hole Web GUI
Note: in order for Web GUI settings to have any effects, you need to configure the RPi or other machines to use it. This is described in the next topics.
Connecting to the GUI
Point your browser to:
http://«your_ip»:8089/admin
where «your_ip» can be:
- The IP address of the Pi-hole system.
- The domain name of the Pi-hole system.
- The multicast DNS name (eg "raspberrypi.local") of the Pi-hole system.
Adding local domain names
Login to the Pi-hole web interface: http://raspberrypi.local:8089/admin:
- Select from Left menu: Local DNS -> DNS Records
- Enter Domain:
raspberrypi.home.arpaand the RPi's IP Address, e.g.192.168.1.10. - Press Add.
Now you can use raspberrypi.home.arpa as the domain name for the Raspberry Pi
in your whole local network. You can also add domain names for your other
devices, provided they too have static IPs.
why .home.arpa?
Instead of .home.arpa - which is the real standard, but a mouthful - you
can use .internal. Using .local would technically work, but it should
be reserved for mDNS use only.
Configure your Pi to use Pi-hole
Your Pi-hole system does not have to use the Pi-hole container for its own DNS services and, in many ways, it is better if it does not. That's because the arrangement creates some chicken-and-egg situations. Examples:
- If the Pi-hole system needs DNS services at boot time before the Pi-hole container is running, the boot may stall;
- If the Pi-hole container is down when another process (eg
aptordocker-compose) needs to do something that depends on DNS services being available.
If you decide to use the Pi-hole container to provide DNS services to your Pi-hole system then you should also set up a fall-back to at least one well-known public DNS server that will kick in whenever your Pi-hole container is down.
Please note that this only helps the Pi-hole system. It does not help other clients in your network to obtain DNS services when your Pi-hole container is down. The intention is to mitigate the chicken-and-egg situations mentioned above so that your Pi-hole container maintains high availability.
First, determine whether Network Manager is running on your system:
$ systemctl is-active NetworkManager
If the response is:
activethen follow the NetworkManager instructions;- otherwise follow the non-NetworkManager instructions
NetworkManager
The first step is to determine the «connection» name for each physical network interface that is active on your Pi-hole system. For example, if your Pi is connected to Ethernet the physical interface is likely to be defined as eth0:
$ nmcli -g GENERAL.CONNECTION dev show "eth0"
Wired connection 1
"Wired connection 1" is the name of the «connection».
If your Pi is also connected to WiFi, substitute wlan0, re-run the command, and make a note of the «connection» name.
Run the following command for each physical interface, substituting «connection»:
$ sudo nmcli con mod "«connection»" ipv4.dns "127.0.0.1,8.8.8.8"
Once you have run that command for each physical interface, activate the change(s) by running:
$ sudo systemctl restart NetworkManager
You can check your work by running:
$ nmcli -g ipv4.dns con show "«connection»"
Detailed explanations of these commands
-
In the
sudo nmcli con modcommand,"127.0.0.1,8.8.8.8"is an ordered, comma- (or space-) separated list:-
The
127.0.0.1substring instructs the Pi-hole system to direct DNS queries to the loopback address. Port 53 is implied. If the Pi-hole container is running in:- non-host mode, Docker is listening to port 53 and forwards the queries to the Pi-hole container;
- host mode, the Pi-hole container is listening to port 53.
-
if there is no response from the Pi-hole container, the
8.8.8.8substring instructs the Pi-hole system to forward the query to that IP address, which is a well-known DNS service provided by Google. Although queries for local domain names will not resolve if your Pi-hole container is down, Google's DNS will resolve global domain names.
-
-
The
systemctl restart NetworkManagercommand instructs the operating system running on your Pi-hole system to apply your changes by rebuilding the active resolver configuration.
non-NetworkManager
Run these commands:
$ echo "name_servers=127.0.0.1" | sudo tee -a /etc/resolvconf.conf
$ echo "name_servers_append=8.8.8.8" | sudo tee -a /etc/resolvconf.conf
$ echo "resolv_conf_local_only=NO" | sudo tee -a /etc/resolvconf.conf
$ sudo resolvconf -u
Detailed explanations of these commands
-
name_servers=127.0.0.1instructs the Pi-hole system to direct DNS queries to the loopback address. Port 53 is implied. If the Pi-hole container is running in:- non-host mode, Docker is listening to port 53 and forwards the queries to the Pi-hole container;
- host mode, the Pi-hole container is listening to port 53.
-
name_servers_append=8.8.8.8instructs the Pi-hole system to fail-over to 8.8.8.8 if Pi-hole does not respond. You can replace8.8.8.8(a Google service) with:- Another well-known public DNS server like
1.1.1.1(Cloudflare). - The IP address(es) of your ISP's DNS hosts (generally available from your ISP's web site).
- The IP address of another DNS server running in your local network (eg BIND9).
- The IP address of your home router. Most home routers default to the ISP's DNS hosts but you can usually change your router's configuration to bypass your ISP in favour of public servers like 8.8.8.8 and 1.1.1.1.
You need slightly different syntax if you want to add multiple fallback servers. For example, suppose your fallback hosts are a local server (eg 192.168.1.2) running BIND9 and 8.8.8.8. The command would be:
$ echo 'name_servers_append="192.168.1.2 8.8.8.8"' | sudo tee -a /etc/resolvconf.conf - Another well-known public DNS server like
-
resolv_conf_local_only=NOis needed so that 127.0.0.1 and 8.8.8.8 can coexist. - The
resolvconf -ucommand instructs the operating system running on your Pi-hole system to rebuild the active resolver configuration. In principle, that means parsing/etc/resolvconf.confto derive/etc/resolv.conf. This command can sometimes return the error "Too few arguments". You should ignore that error.
flowchart LR
  RERECONF["/etc/resolvconf.conf"] --- UP([resolvconf -u])
  DHCP[DHCP provided DNS-server] --- UP
  UP -- "generates" --> RECONF["/etc/resolv.conf"]
  classDef command fill:#9996,stroke-width:0px
  class UP command
Advanced options: ignoring DHCP provided DNS-servers, local domain name search
-
If you wish to prevent the Pi-hole system from including the address(es) of DNS servers learned from DHCP, you can instruct the DHCP client running on the Pi-hole system to ignore the information coming from the DHCP server:
$ echo 'nooption domain_name_servers' | sudo tee -a /etc/dhcpcd.conf $ sudo service dhcpcd reload $ sudo resolvconf -u -
If you have followed the steps in Adding local domain names to define names for your local hosts, you can inform the Pi-hole system of that fact like this:
$ echo 'search_domains=home.arpa' | sudo tee -a /etc/resolvconf.conf
$ sudo resolvconf -u
That will add the following line to
/etc/resolv.conf:search home.arpaThen, when you refer to a host by a short name (eg "fred") the Pi-hole system will also consider "fred.home.arpa" when trying to discover the IP address.
Using Pi-hole as your local DNS
To use the Pi-hole container to provide DNS services in your LAN, you need to assign the Pi-hole system a fixed IP-address and configure this IP as your DNS server.
Fixed IP address for Pi-hole
If you want clients on your network to use Pi-hole for their DNS, the Pi-hole system must have a fixed IP address. It does not have to be a static IP address (in the sense of being hard-coded into the Pi-hole system). The Pi-hole system can still obtain its IP address from DHCP at boot time, providing your DHCP server (usually your home router) always returns the same IP address. This is usually referred to as a static binding and associates the Pi-hole system's MAC address with a fixed IP address.
Keep in mind that many Raspberry Pis have both Ethernet and WiFi interfaces. It is generally prudent to establish static bindings for both network interfaces in your DHCP server.
You can use the following command to discover the MAC addresses for your Raspberry Pi's Ethernet and WiFi interfaces:
$ for I in eth0 wlan0 ; do ip link show $I ; done
2: eth0: <BROADCAST,MULTICAST,UP,LOWER_UP> mtu 1500 qdisc mq state UP mode DEFAULT group default qlen 1000
    link/ether dc:a6:32:4c:89:f9 brd ff:ff:ff:ff:ff:ff
3: wlan0: <BROADCAST,MULTICAST,UP,LOWER_UP> mtu 1500 qdisc pfifo_fast state UP mode DEFAULT group default qlen 1000
    link/ether e5:4f:01:41:88:b2 brd ff:ff:ff:ff:ff:ff
In the above:
- The MAC address of the Ethernet interface is "dc:a6:32:4c:89:f9"
- The MAC address of the WiFi interface is "e5:4f:01:41:88:b2"
If a physical interface does not exist, the command returns "Device does not exist" for that interface. If you prefer, you can also substitute the ifconfig command for ip link show. It's just a little more wordy.
Configure clients to use Pi-hole
In order for Pi-hole to block ads or resolve anything, clients need to be told to use it as their DNS server. You can either:
- Adopt a whole-of-network approach and edit the DNS settings in your DHCP server so that all clients are given the IP address of the Pi-hole system to use for DNS services when a lease is issued.
- Adopt a case-by-case (manual) approach where you instruct particular clients to obtain DNS services from the IP address of the Pi-hole system.
Option 1 (whole-of-network) is the simplest approach. Assuming your Pi-hole system has the static IP 192.168.1.10:
-
Go to your network's DHCP server. In most home networks, this will be your Wireless Access Point/WLAN Router:
- Login into its web-interface
- Find where DNS servers are defined (generally with DHCP controls)
- Change all DNS fields to
192.168.1.10
-
All local clients have to be rebooted. Without this they will continue to use the old DNS setting from an old DHCP lease for quite some time.
Option 2 (case-by-case) generally involves finding the IP configuration options for each host and setting the DNS server manually. Manual changes are usually effective immediately without needing a reboot.
advanced configurations
Setting up a combination of Pi-hole (for ad-blocking services), and/or a local upstream DNS resolver (eg BIND9) to be authoritative for a local domain and reverse-resolution for your local IP addresses, and decisions about where each DNS server forwards queries it can't answer (eg your ISP's DNS servers, or Google's 8.8.8.8, or Cloudflare's 1.1.1.1) is a complex topic and depends on your specific needs.
The same applies to setting up a DHCP server (eg DHCPD) which is capable of distinguishing between the various clients on your network (ie by MAC address) to make case-by-case decisions as to where each client should obtain its DNS services.
If you need help, try asking questions on the IOTstack Discord channel.
other containers
Docker provides a special IP 127.0.0.11, which listens to DNS queries and resolves them according to the host RPi's resolv.conf. Containers usually rely on this to perform DNS lookups. This is nice as it won't present any surprises as DNS lookups on both the host and in the containers will yield the same results.
It's possible to make DNS queries directly cross-container, and even supported in some rare use-cases.
Testing and Troubleshooting
Make these assumptions:
-
You have followed the instructions above to add these lines to
/etc/resolvconf.conf:name_servers=127.0.0.1 name_servers_append=8.8.8.8 resolv_conf_local_only=NO -
The Pi-hole system has the IP address 192.168.1.10 which it obtains as a static assignment from your DHCP server.
- You have configured your DHCP server to provide 192.168.1.10 for client devices to use to obtain DNS services (ie, you are saying clients should use Pi-hole for DNS).
The result of the configuration appears in /etc/resolv.conf:
$ cat /etc/resolv.conf
# Generated by resolvconf
nameserver 127.0.0.1
nameserver 192.168.1.10
nameserver 8.8.8.8
Interpretation:
nameserver 127.0.0.1is present because ofname_servers=127.0.0.1nameserver 192.168.1.10is present because it was learned from DHCPnameserver 8.8.8.8is present because ofname_servers_append=8.8.8.8
The fact that the Pi-hole system is effectively represented twice (once as 127.0.0.1, and again as 192.168.1.10) does not matter. If the Pi-hole container stops running, the Pi-hole system will bypass 192.168.1.10 and fail over to 8.8.8.8, failing back to 127.0.0.1 when the Pi-hole container starts again.
Install dig:
$ sudo apt install dnsutils
Test that Pi-hole is correctly configured (should respond 192.168.1.10):
$ dig raspberrypi.home.arpa @192.168.1.10
To test on another machine if your network's DNS configuration is correct, and an ESP will resolve its DNS queries correctly, restart the other machine to ensure DNS changes are updated and then use:
$ dig raspberrypi.home.arpa
This should produce the same result as the previous command.
If this fails to resolve the IP, check that the server in the response is
192.168.1.10. If it's 127.0.0.xx check /etc/resolv.conf begins with
nameserver 192.168.1.10. If not, check the machine is configured to use DHCP
and revisit Pi-hole as DNS.
Microcontrollers
If you want to avoid hardcoding your Pi-hole system's IP address into your ESPhome devices, you need a DNS server that will do the resolving. This can be done using the Pi-hole container as described above.
*.local won't work for ESPhome
There is a special case for resolving *.local addresses. If you do a ping raspberrypi.local on your desktop Linux or the Raspberry Pi, it will first try using mDNS/bonjour to resolve the IP address raspberrypi.local. If this fails it will then ask the DNS server. ESPhome devices can't use mDNS to resolve an IP address. You need a proper DNS server to respond to queries made by an ESP. As such, dig raspberrypi.local will fail, simulating ESPhome device behavior. This is as intended, and you should use raspberrypi.home.arpa as the address on your ESP-device.
Getting a clean slate
If Pi-hole misbehaves, you can always try starting from a clean slate by erasing Pi-hole's persistent storage area. Erasing the persistent storage area causes PiHole to re-initialise its data structures on the next launch. You will lose:
- Any configuration options you may have set via the web GUI that are not otherwise reflected in environment variables.
- Any whitelist, blacklist or local DNS records you entered.
- All DNS resolution and blocking history.
Also note that your administrative password will reset.
The recommended approach is:
- Login to Pi-hole's web GUI and navigate to Settings » Teleporter.
- Click the Backup button to download a backup.
- Logout of the Web GUI.
-
Run the following commands:
$ cd ~/IOTstack
$ docker-compose down pihole
$ sudo rm -rf ./volumes/pihole
$ docker-compose up -d pihole
see also if downing a container doesn't work
-
Login to Pi-hole's web GUI and navigate to Settings » Teleporter.
- Use the checkboxes to select the settings you wish to restore, and click the Browse and Restore buttons.
Docker Desktop
If you run Pi-hole using Docker Desktop for macOS, all client activity will be logged against the IP address of the default gateway on the internal bridged network.
It appears that Docker Desktop for macOS interposes an additional level of Network Address Translation (NAT) between clients and the Pi-hole service. This does not affect Pi-hole's ability to block ads. It just makes the GUI reports a little less useful.
It is not known whether this is peculiar to Docker Desktop for macOS or also affects other variants of Docker Desktop.
This problem is peculiar to Docker Desktop. It does not affect Pi-hole running in a container on other systems (eg Raspberry Pi, Proxmox-VE guest).