deCONZ
References
Setup
The service definition shipped with IOTstack contains the following lines:
devices:
  - "${DECONZ_DEVICE_PATH:?eg echo DECONZ_DEVICE_PATH=/dev/ttyUSB0 >>~/IOTstack/.env}:/dev/ttyUSB0"
The second line decomposes about the colon separator like this:
- External device:
${DECONZ_DEVICE_PATH:?eg echo DECONZ_DEVICE_PATH=/dev/ttyUSB0 >>~/IOTstack/.env} - Internal device:
/dev/ttyUSB0
In words, the external device is interpreted like this:
-
If the environment variable
DECONZ_DEVICE_PATHis defined in~/IOTstack/.envthen use that value. For example, if~/IOTstack/.envcontains:DECONZ_DEVICE_PATH=/dev/ttyUSB0then the whole clause is interpreted as:
devices: - "/dev/ttyUSB0:/dev/ttyUSB0" -
Otherwise, display a long-winded and not particularly informative message which will have this buried in the middle:
eg echo DECONZ_DEVICE_PATH=/dev/ttyUSB0 >>~/IOTstack/.envThat's a hint telling you that
DECONZ_DEVICE_PATHis not defined in~/IOTstack/.envand that you should define it by running the command:$ echo DECONZ_DEVICE_PATH=/dev/ttyUSB0 >>~/IOTstack/.envThat command assumes your Conbee/Conbee II/RaspBee attaches to your host as
/dev/ttyUSB0. If your adapter attaches as a different device, substitute accordingly.
Note that the right hand side (the internal device path) is fixed. It doesn't matter how your Conbee/Conbee II/RaspBee is attached to the host, the container will always treat it as being /dev/ttyUSB0.
If your Conbee/Conbee II/RaspBee adapter attaches as a different device, you can do any of the following:
-
Edit
~/IOTstack/.env; or -
Configure the deconz service from the command line by running:
$ cd ~/IOTstack $ ./iotstack-menu.sh configure deconz -
Configure deconz service from the menu by running:
Then choose:$ cd ~/IOTstack $ ./iotstack-menu.sh- Services
- deconz
- Configure
There is no difference in the two approaches. All write into the .env file.
Whenever you change devices, you need to tell the container to take notice:
$ cd ~/IOTstack
$ docker compose up -d deconz
Dialout group
Before running docker compose up -d, make sure your Linux user is part of the dialout group, which allows the user access to serial devices (i.e. Conbee/Conbee II/RaspBee). If you are not certain, simply add your user to the dialout group by running the following command (username "pi" being used as an example):
$ sudo usermod -a -G dialout pi
Troubleshooting
Your Conbee/Conbee II/RaspBee gateway must be plugged in when the deCONZ Docker container is being brought up. If your gateway is not detected, or no lights can be paired, try moving the device to another usb port. A reboot may help too.
Use a 0.5-1m usb extension cable with ConBee (II) to avoid wifi and bluetooth noise/interference from your Raspberry Pi (recommended by the manufacturer and often the solution to poor performance).
Accessing the Phoscon UI
The Phoscon UI is available using port 8090 (http://your.local.ip.address:8090/)
Viewing the deCONZ Zigbee mesh
The Zigbee mesh can be viewed using VNC on port 5901. The default VNC password is "changeme".
Connecting deCONZ and Node-RED
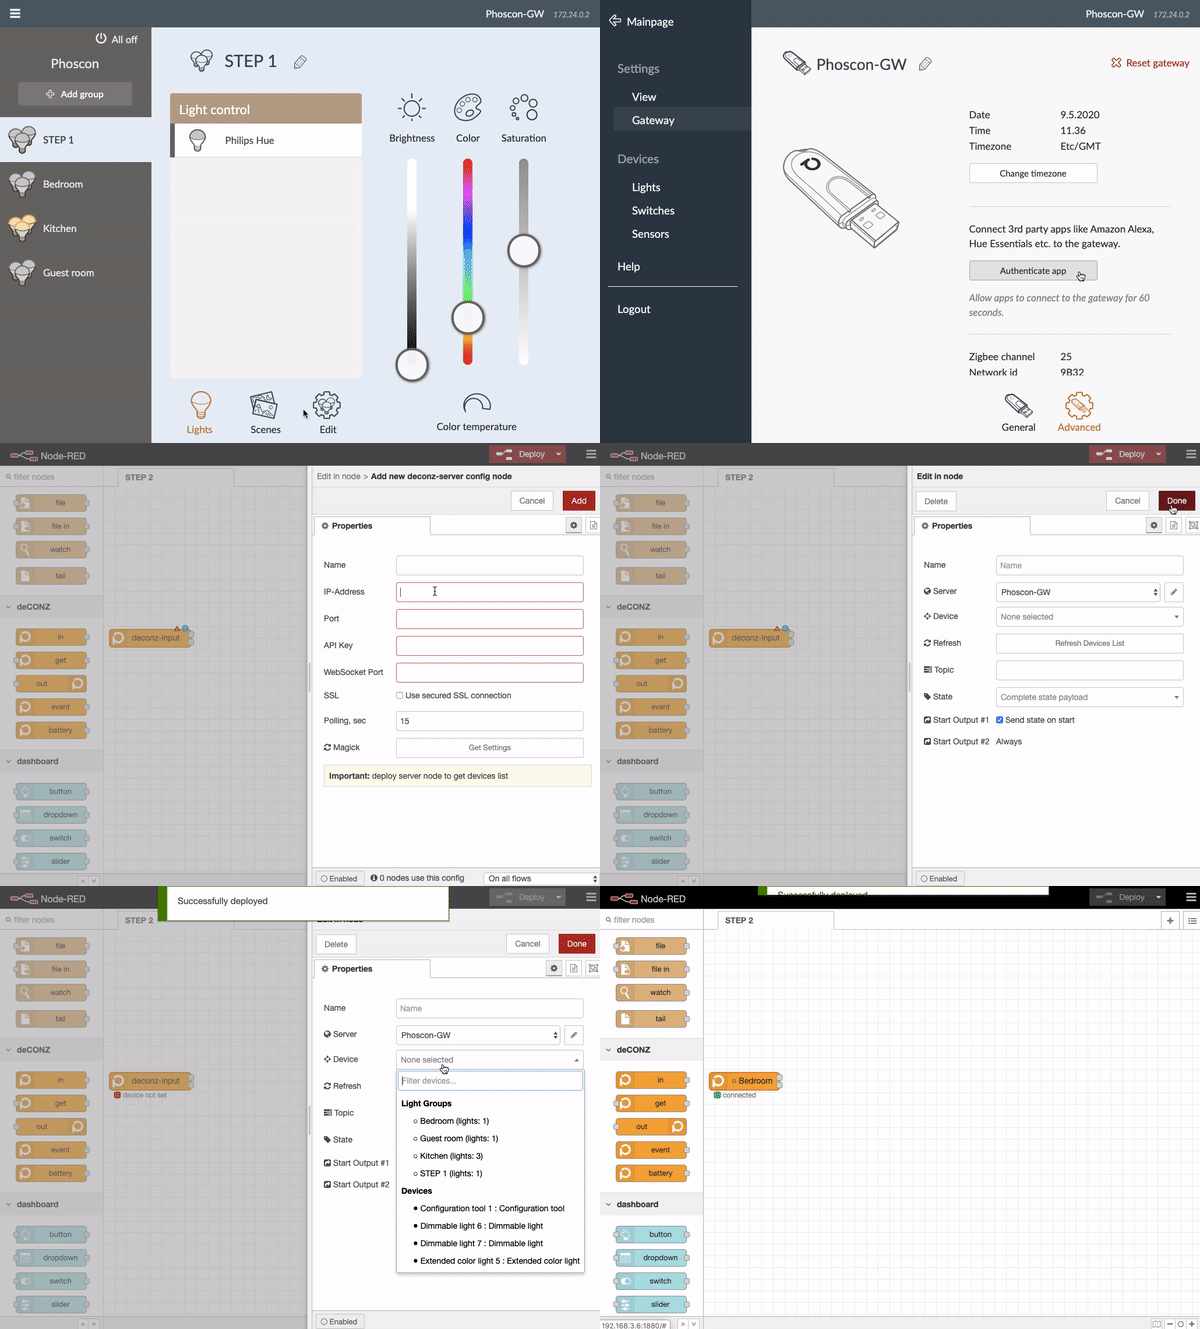
Install node-red-contrib-deconz via the "Manage palette" menu in Node-RED (if not already installed) and follow these 2 simple steps (also shown in the video below):
Step 1: In the Phoscon UI, Go to Settings > Gateway > Advanced and click "Authenticate app".
Step 2: In Node-RED, open a deCONZ node, select "Add new deonz-server", insert your ip adress and port 8090 and click "Get settings". Click "Add", "Done" and "Deploy". Your device list will not be updated before deploying.